Editing Event Nodes
Robonito allows you to heavily fine-tune your recorded test logic manually from the desktop dashboard. Each action captured during a recording session (clicks, typing, assertions) is saved as an individual Event Node on your test timeline.
Accessing the Edit Panel
To edit the configuration parameters of an existing step:
- Open your target Test Case in the Test Explorer.
- Hover over the specific step you want to modify in the execution timeline.
- Click the Edit (✏️) icon located on the right side of the step node.
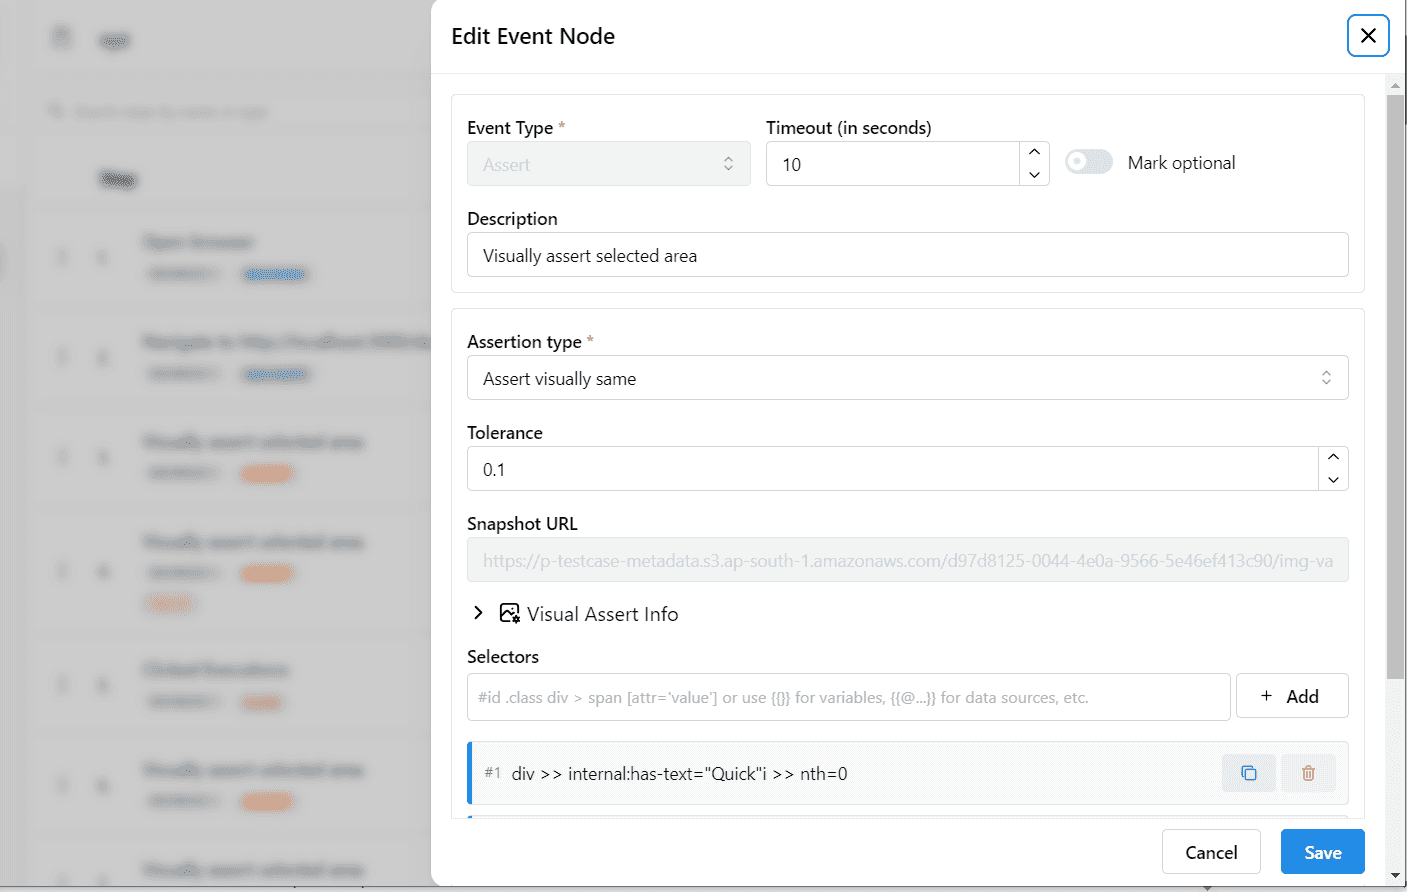
- The Node Configuration Panel will expand, revealing the technical parameters for that event.
Core Configuration Parameters
Depending on the specific Event Type (e.g., Click, Input, Assert), the following primary settings are exposed:
1. Element Selectors
Selectors represent the exact DOM paths Robonito utilizes to find target elements on the page. By default, the recorder captures highly resilient composite selectors.
- You can manually inject new CSS or XPath targets.
- You can delete brittle sub-selectors to force the engine to rely on more stable identifiers (like
#idor data attributes).
2. Node Timeout
This defines the maximum time (in seconds) the runtime engine will wait for the target element to become interactive or visible before failing the test.
- Default: 10 seconds.
- Tip: If your web application has specific pages that load slowly or heavily rely on delayed API fetches, increase this timeout for the associated step to prevent flaky execution validation.
3. Execution Priority (Optional Flag)
Toggling the Mark Optional switch flags the step as non-critical. If an optional step fails to execute (e.g., a promotional pop-up did not appear today, so the "Close Pop-up" click failed), the engine will dynamically ignore the failure and gracefully continue executing the rest of the test suite.
Assertion Configuration
If you are explicitly editing an Assert or Visual Assert node, additional validation parameters become available:
- Mathematical Tolerance (Visual Only): Determine how strictly Robonito compares baseline images to live execution screenshots. A tolerance of
0.0demands mathematical pixel perfection, while0.2allows for minor rendering shifts (like anti-aliasing differences). - Matching Value (Text Assertions): Modify the exact internal string expected to exist within the target DOM node.
Saving Changes
All modifications made in the right-side properties panel are held in a draft state until you explicitly click the Save button. Once saved, the new parameters are instantly synchronized with the backend database and will be securely utilized in the very next execution run.